

Want to beat the Trace Escape Room in the Cool Maths Games? The guide below has all the steps in detail that will help you out.
Trace is a free escape room game available on Cool Math Games that can be played directly on your browser. The game follows a similar format to Escape Simulator, where you start off by being stuck in an unknown location and must find a way to escape. You’ll have access to certain items and clues in your inventory, but you’ll need to search for additional objects and solve puzzles to advance. If you’re struggling to progress in the Trace Escape Room then this guide is for you.
Get the code
Take the sink’s half-scissors. Clicking the photo behind the bathroom mirror reveals a four-digit combination. You will have to get the numbers. Click the toilet roll once to reveal 5. Open the gold box above the toilet: Note the lights above the mirror and press the corresponding buttons (1, 3, 4) on the box. The second number is 8.
Fix the star five-colored electricity puzzle. A puzzle matches the five-pointed star above the toilet on the wooden enclosure. press the coloured arrow on the puzzle so that when you press the centre button, the yellow lines form a star pattern (see image). This turns the toilet’s left-side door panel’s red light green. Open that closet to acquire the other half of the scissors and the fourth number of a combo, 16.
After fixing your scissors, cut the cord holding the red key to the wall by the mirror. Use the red key to open the silver box above the toilet to find a crumpled paper and the third combination number (.35).
Get the combination
The crumpled paper shows the mirror and washbasin area with an x-marks-the-spot for the mirror tiles. Zoom in to find a loose tile. The five-color jigsaw behind the toilet is used to color a fish on its back. Again, align the arrows to coy the picture and open the right cabinet. Open that door to find more code numbers (1, 2,.05, 8) underneath the lines. Divide them to get the combination (5472).
This combination opens the small safe behind the picture. Take this and return to the cabinet you opened to the left of the toilet, which has a pumpkin. After inserting the bulb, the pumpkin lid reveals five familiar-colored circles with sticks pointing in different directions. Use the colored electricity puzzle arrows to open the final cabinet underneath the sink. Keyed red tile inside.
Put this in the bathroom door panel. The puzzle slides. Move the pieces until the large green and yellow pieces are all to the right, sliding the red piece over the top until all you need to do is maneuver the small purple pieces and move the red key piece over the green lock square. It unlocks.
The house
Grab the metal star, battery, and ogre figure from the couch. The top desk drawer contains a blue tin horse and another metal star on the wall. Inventory these things.
Walk to the bay window and photograph the planets’ patterns. Open the cabinet under the window and arrange the puzzle to resemble a planet (a low, high, middle, high, middle). Press the red button below the puzzle to unlock a small hatch and take the shattered metal tablet within. Return to the little hallway by the bathroom and use the tin horse on the window image by looking at it in your inventory. Neck lengthens. Follow the maze to bend the giraffe toy’s neck until its eye meets the blue diamond on the window image. To receive the metal tablet piece, click the giraffe button.
Click the tall art on the wall opposite the bathroom door to reveal a metal puzzle. Match it to the completed metal tablet to expose the puzzle’s red button. The long painting above the fish tank has six symbols in a row. The six red buttons around the room must be pressed in order: by the fish tank, on the fan on the shelf in the corner, on the computer, in the globe puzzle cabinet, behind the painting on the problem we just solved, and on the small grey box. Open the grey box to acquire a green key and a utility knife. Enter the terrace through the corner green door with the green key.
Patio: Take the vampire figure
Another step to beat the Trace Escape Room is to take the vampire figure from the shelf. Then, go to the circular image on the wall that has four black cubes with potted plant images on each side. Arrange them from left to right and top to bottom in the order of hanging, tall pot, tall plant, and painting. Press the red button in the middle and grab the metal star. After this, move to the corner of the patio and do the giraffe puzzle again to get another battery. Grab the metal star from the table near the mini piano, and then click on the table with the blue tablecloth in the main patio area to get another metal star. Complete the jigsaw puzzle on the table to get six metal stars, but you’ll need to find the missing piece.
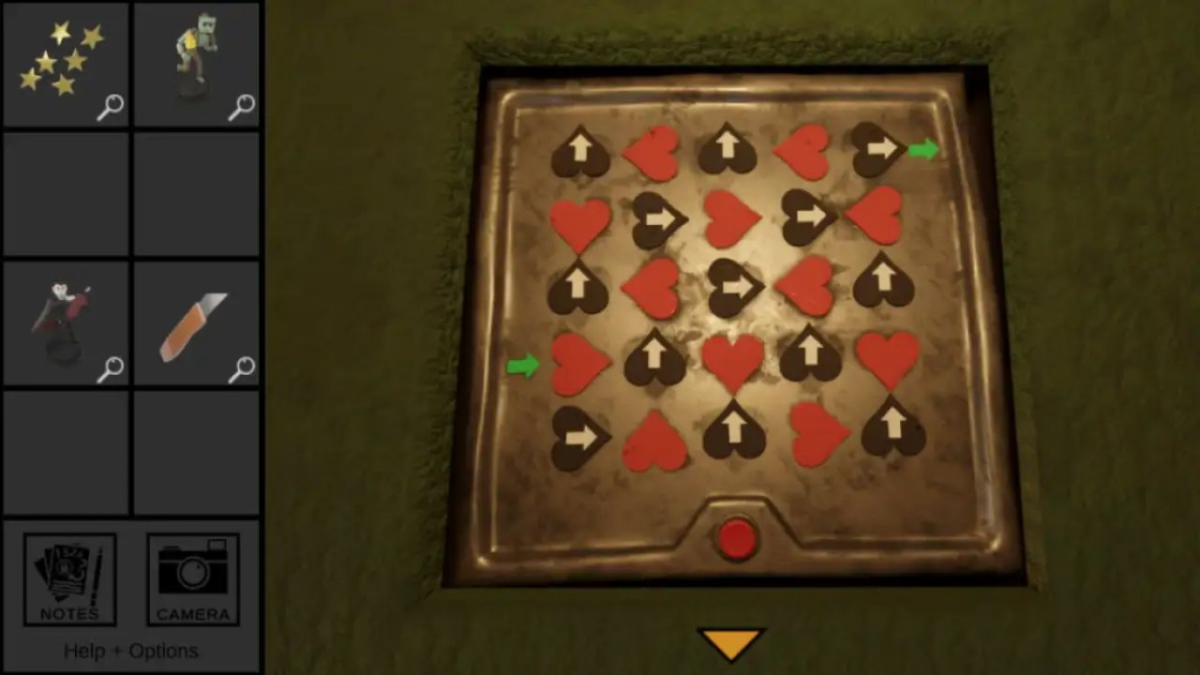
Now, use the utility knife to cut the carpet under the desk and reveal a puzzle of red and black hearts. Insert the two batteries into the lamp on the desk and turn it on to see arrows that help you complete the puzzle. Turn the black hearts in the right direction so that all the points of the hearts go in the right way. Press the red button to open the box and grab the puzzle piece and yellow submarine. Place the submarine in the fish tank.
Find the Puzzle Piece
Go outside again and put the final puzzle piece in its place. This reveals that you need to use the utility knife on the arm of the sofa. Head back inside and click on the plant pot by the sofa, then on the chair arm, and use the knife to reveal a panel and take the pentagon key from inside it. Now, look under the desk where there are numbers written on the wall.
Examine the key while zooming in on the numbers, and you’ll place the key over them, giving you the sequence 9, 2, 3. Use this to log into the computer on the desk, and then click the water bowl icon to take control of the submarine in the fish tank. Use the submarine to go into the castle in the tank to find the code 26336 6161 on the inside wall.
Trace Escape Room Tower
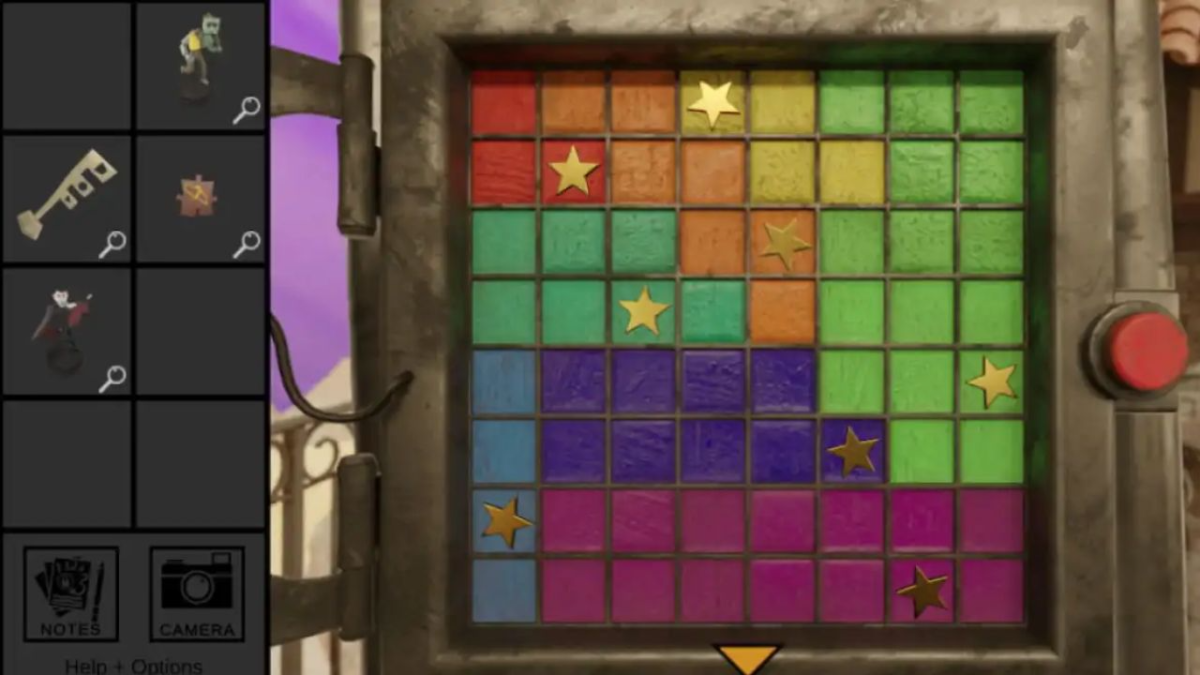
The combination obtained from the giraffe puzzle unlocks a panel on the barred door. The panel has several colored squares where the metal stars need to be placed. You still need one metal star to complete the panel. To get it, use the computer once again, select the robot option, and make it climb to reveal some instructions. Follow the instructions to open and close the drawers in the correct order (X, O, X, O) and open the U drawer to find a magnet. Use the magnet to retrieve the missing star from the glass tube under the left side of the table with the heart puzzle.
Once you have all the metal stars, place them in the panel according to the given pattern. Make sure that no two adjacent stars share the same row, column, or color. This will open the front door and grant you access to the tower. Inside the tower, go to a small table with a vase of red flowers. Then solve the sliding puzzle above it, setting it to down arrow, s, jagged line, d, x. This opens a hole in the wall, from which you can obtain the third figure (phoenix) and a key for the umbrella. While in the tower, grab the robot hanging on the wire and look out of the window at the bottom of the stairs to see the words “CABBAGE FACED” written.
Use the Umbrella Key
Use the umbrella key to unlock the umbrella on the porch and open it to reveal an image on the porch chair. Take a picture of the image and hang the robot on the kite string. Next, play the notes in the order of “CABBAGE FACED” on the tiny piano to open it and retrieve the robotic arm inside. Go back inside, add the robotic arm to the submarine, place it back in the fish tank, and use the computer once again.
Using the computer
Using the robot on the computer, climb and turn right to view a row of symbols on the bridge (circle, square, triangle, star, square, triangle, circle). Return to the tower with the submarine, open the chest, and find a message that says “I DID DEEDS,” which is the reverse of the number code seen earlier. Head back to the tower, open the drawer with flowers on the table, and input “I DID DEEDS” into the machine to receive the fourth figure (a dragon).
Enter the central room in the tower through the door and use the pin board on the back wall to trace the same image found on the porch chair (a wizard’s hat above it). This unlocks an eight-light puzzle above, which can be solved by clicking the lights until they all go off. The order is as follows: 12356784, with 1 being the light just clockwise of 12-o-clock on a watch face. This reveals an image on the stone plinth in the room.
Place the four figures on the X spaces on the plinth at their relevant crossover points (phoenix = fire and wings, vampire = wings and teeth, ogre = fire and teeth, dragon in the middle) to obtain a screwdriver. Head back upstairs to the machine with the golden lamp and enter the symbols seen on the bridge through the eyes of the robot. This reveals a flight plan puzzle.
| Read How to Solve Purple Lantern Puzzle in Fortnite |
Trace Escape Room Main House
To access the Tower program on the computer, use the screwdriver to remove the metal panel under the fan shelf in the main house, which displays the password consisting of six symbols, <0-|-<. Once you access the Tower program, open the Mathemagic program and complete it to learn the mathematical symbol for each symbol on the safe under the desk. Use this knowledge to enter the correct symbols on the safe and open it. Inside, you’ll find the companion book for the Adventures of a Wayward Cosmonaut on the table.
Color order of the planets
Take note of the color order of the planets visited in both books and the launch date (orange, earth, white, orange, blue, white, 2793), which you input into the machine upstairs in the tower. Take a screenshot of the image on the machine’s table and go to the pyramid object in the bay window. Adjust the triangle points to match the colors in your screenshot, causing the pyramid to open and reveal the pyramid key. Use the pyramid key to reopen the bathroom door and the pentagon key to open the lid of the toilet, which is actually an escape hatch. Congratulations, you have successfully completed the Trace escape room.
For more related content check out our dedicated website Gamition.
More E-Sports news:
- How to fix ‘Failed to Replace Files’ in Genshin Impact
- How to Complete Bunnies On The Run Quest in Disney Dreamlight Valley?
- Top 10 Games like Fortnite on Mobile – Android and iOS
Follow our dedicated E-Sports page for instant E-Sports news and updates